The ideas below range from a leopard print border to a beer theme, martini glass illustrations, champagne and disco, ice cream, bows and pearls, pastel stripes, and florals, and acrylic paint carries most of them.
1. Leopard Print Design
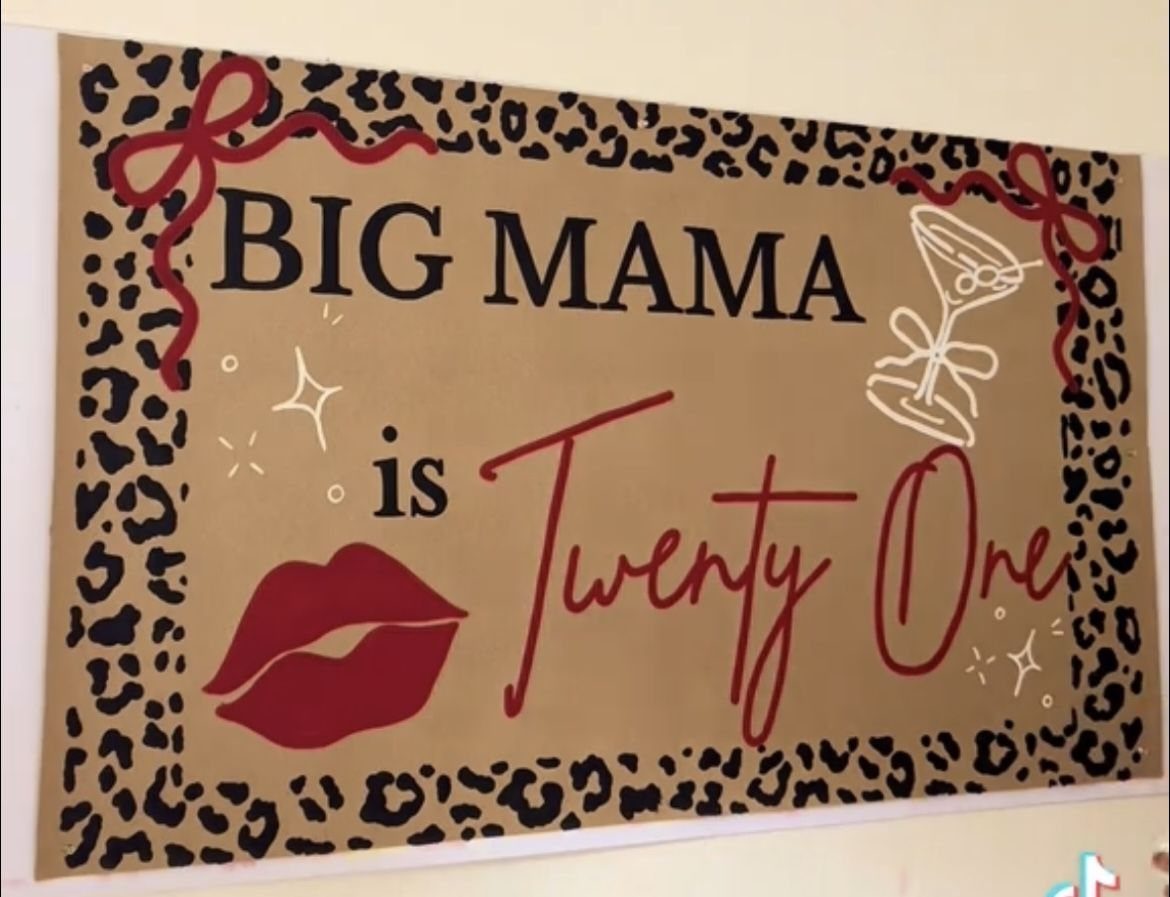
A leopard border does the heavy lifting on a brown banner, because the spots frame the lettering without needing any other background.
Paint the border last, once the name and the "Twenty One" are dry, so a slip of the brush never lands on the words.
Leopard rosettes are easy: dab a loose tan or dark brown blob, then outline it with broken black curves.
Keep them uneven. Red accents such as bows or lips make a good pairing with the print.
2. Beer-themed Design
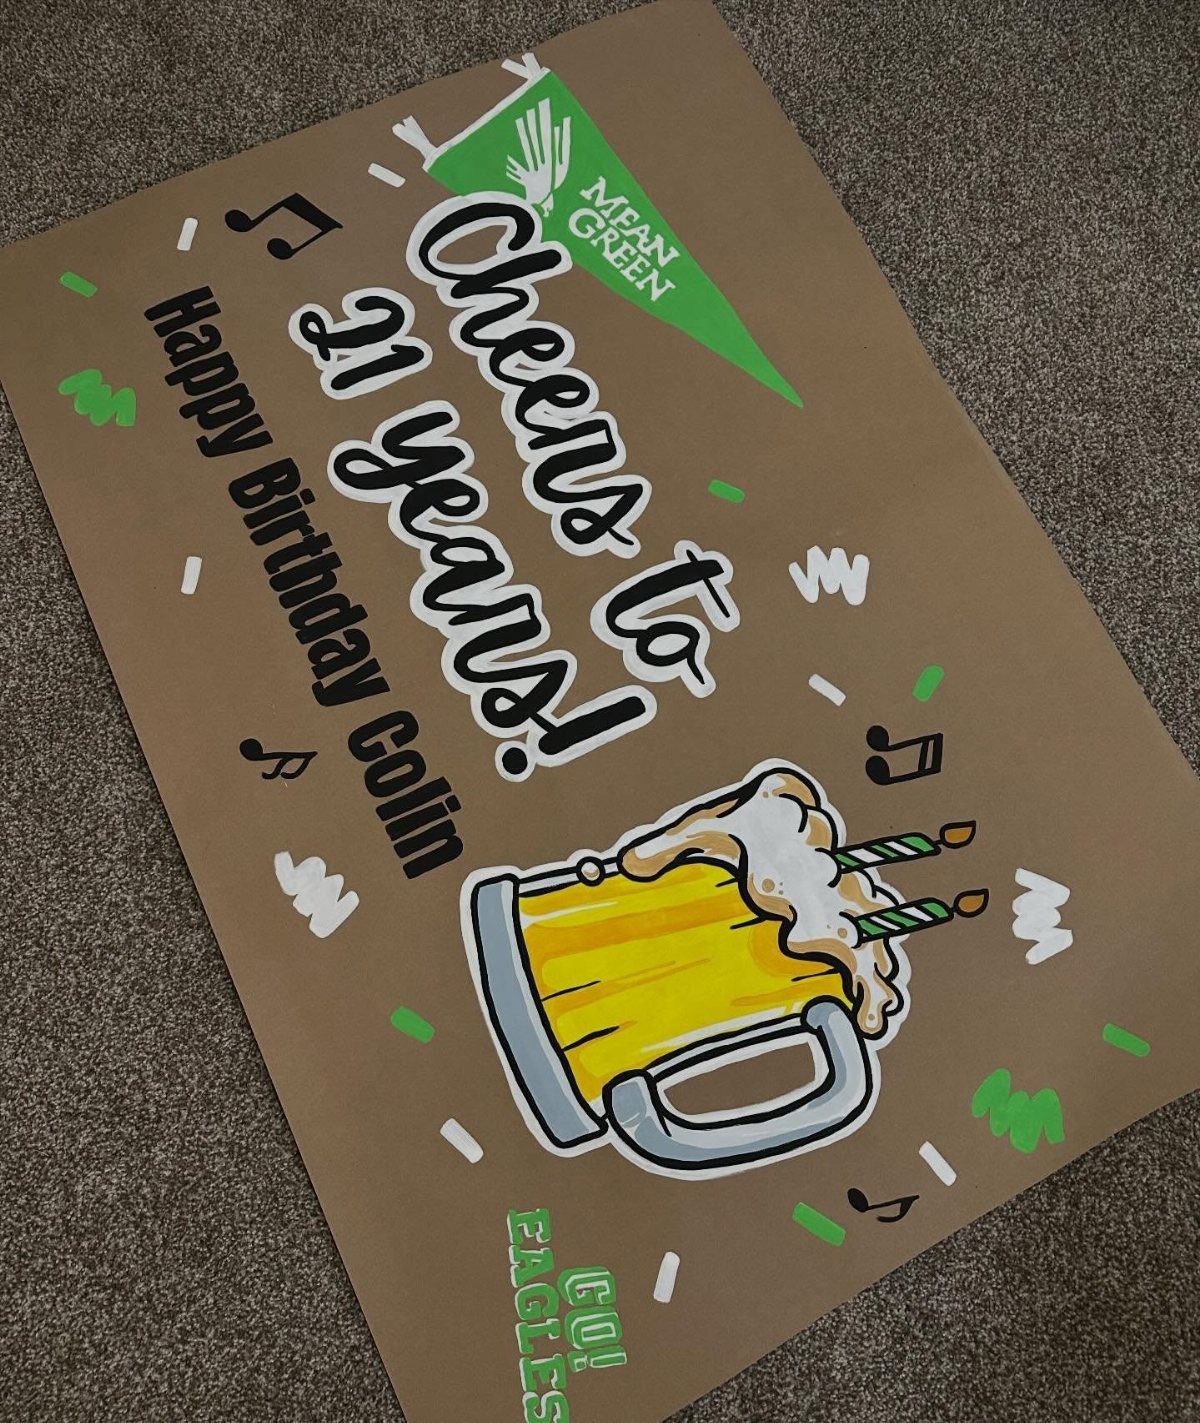
Beer mug art suits a 21st better than almost any other picture, since the first legal pour is the joke. A cardboard banner keeps it cheap, and a brown surface gives you a ready-made color for the beer.
I would paint the mug in 3 steps: a pale foam cap, an amber body, then a white highlight stripe. Add the guest of honor’s name and a favorite team, since a banner this personal gets photographed all night.
3. Martini Glass Illustrations
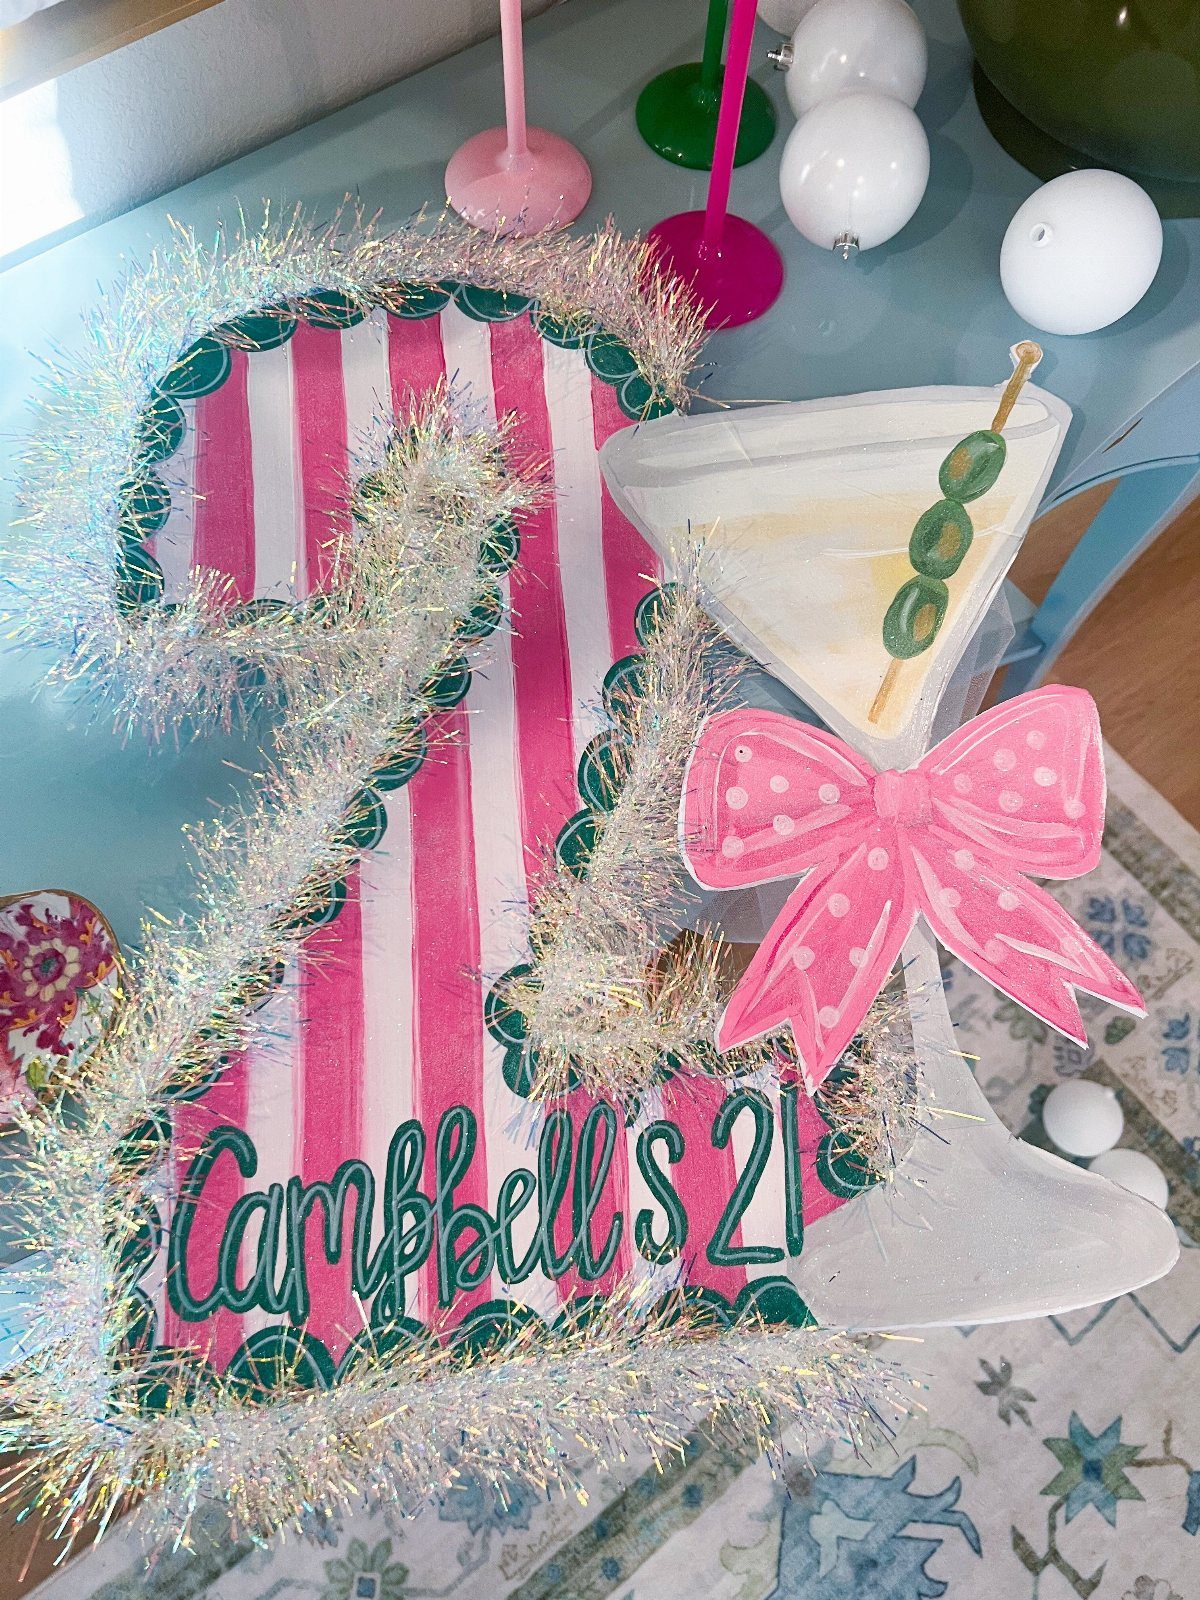
A painted number on its own skips the long banner format and gives you a standalone piece for a table or a wall.
Stripes fill the numerals quickly, and a martini glass with a small bow on top adds the party signal without much detail.
Cutting the glass as a separate shape and gluing it on saves you from painting around curves.
Tinsel along an edge costs little and catches light in photos. Put the name right on the number so the piece reads from across a room.
4. Customizable Options
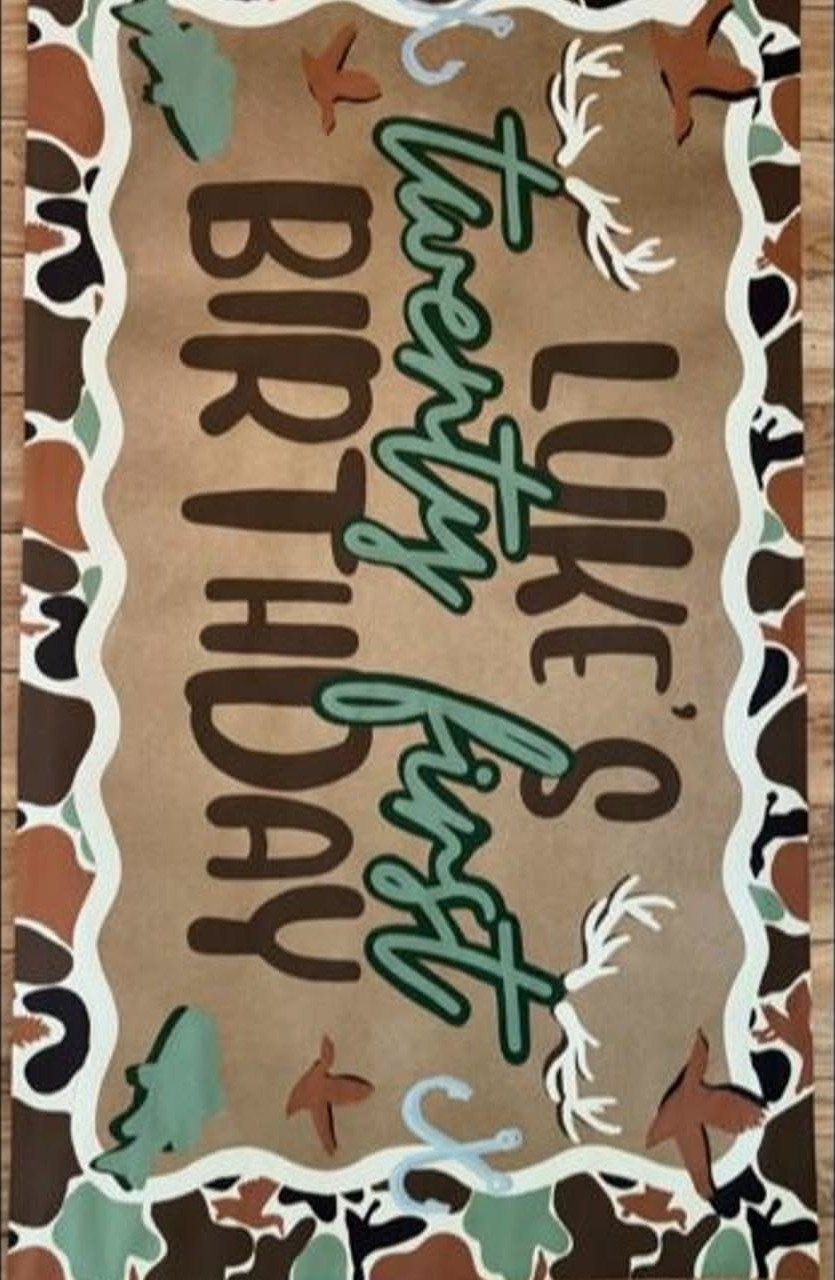
Personalizing is the whole appeal: pick one hobby of the birthday person and let it set the border, motifs and lettering colors.
Ask a friend or parent what the guest of honor loves before you buy paint. Write the name in a big, simple hand, then spell the age out in words, as "twenty first" for a softer look than the numeral.
5. Champagne and Disco Theme
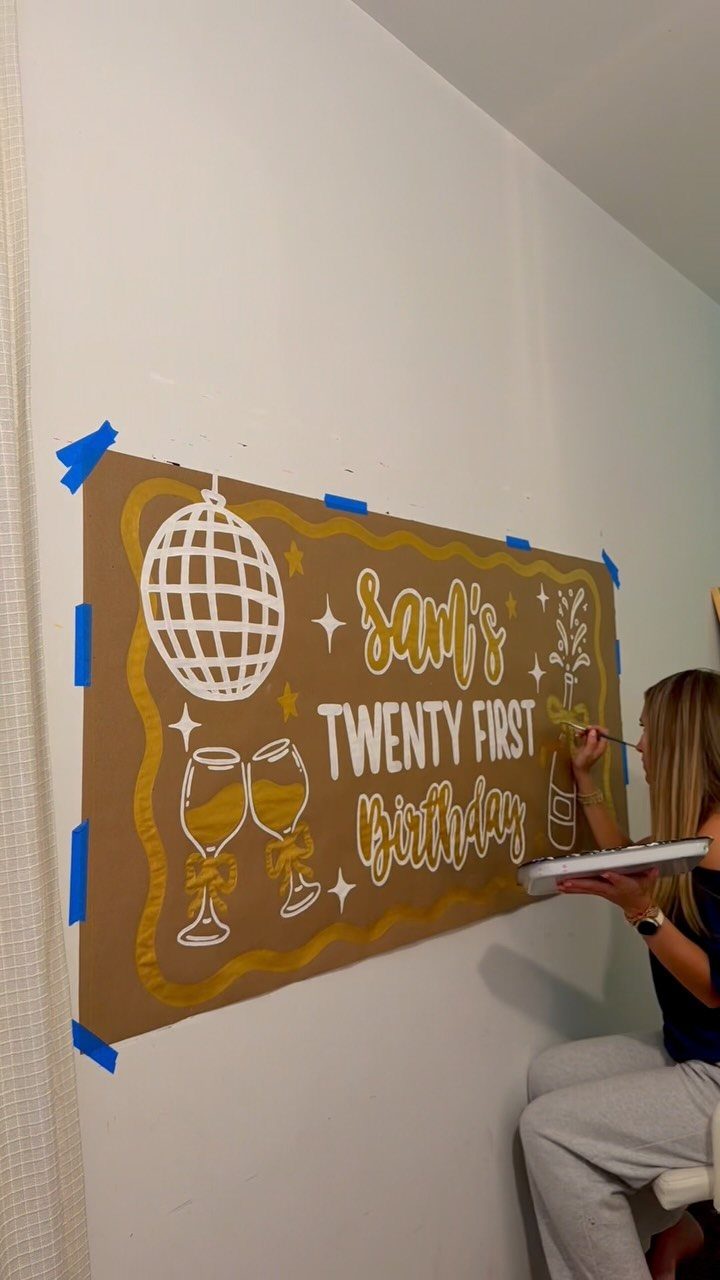
Disco ball plus champagne glasses is the easiest way to paint glamour.
For the ball, paint a silver circle, then fill it with a grid of small squares in gray, white and a touch of blue; the grid is what sells it.
Draw the glasses as simple tulip shapes with a few dots for bubbles.
Working with the banner taped flat to a wall lets you step back and check the spacing. Lay out names in pencil first.
6. Ice Cream Theme
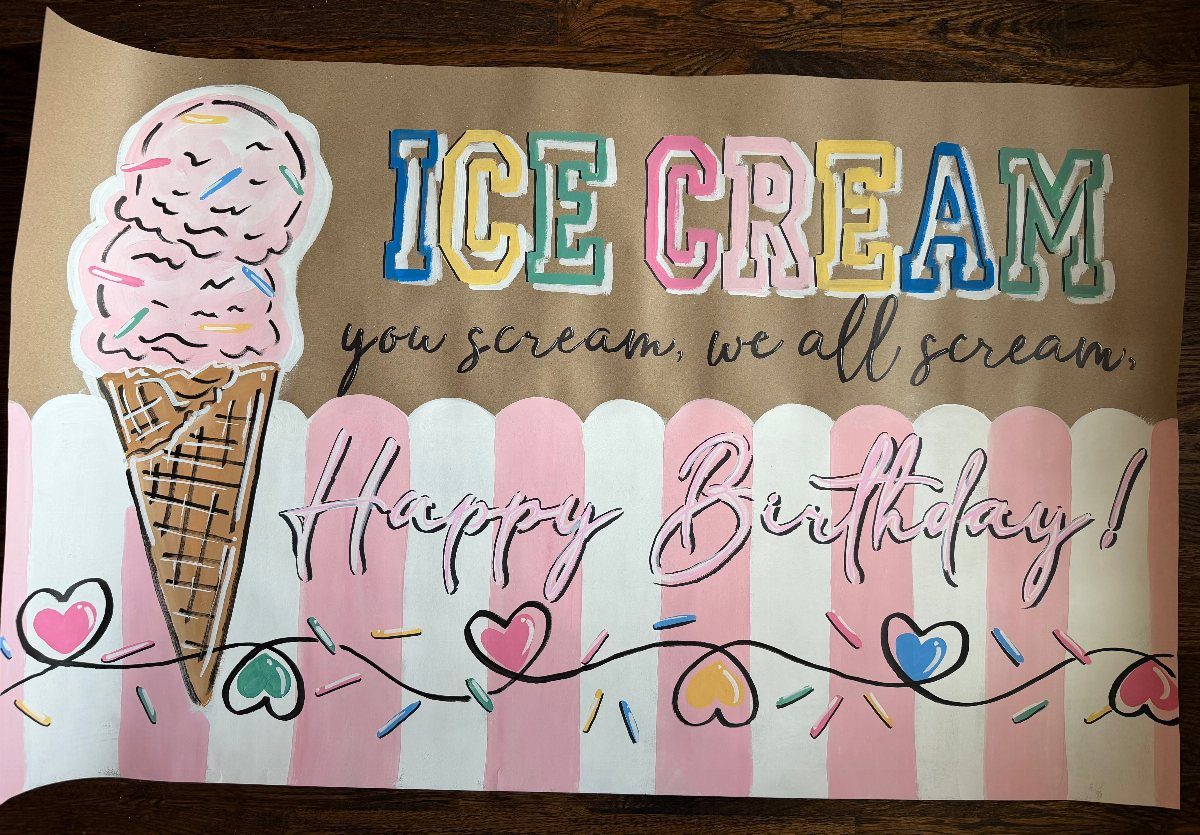
"You scream, we all scream" is a ready-made caption, and it makes an ice cream banner feel playful instead of sweet-only. A big cone in pink carries the design; add a few drips down the scoop for movement.
Pink and white stripes behind it are simple with painter’s tape: tape the lines, paint between them, and peel when dry.
I would pick this one for a daytime party or a dessert table, where the banner can hang right above the treats.
7. Bows and Pearls
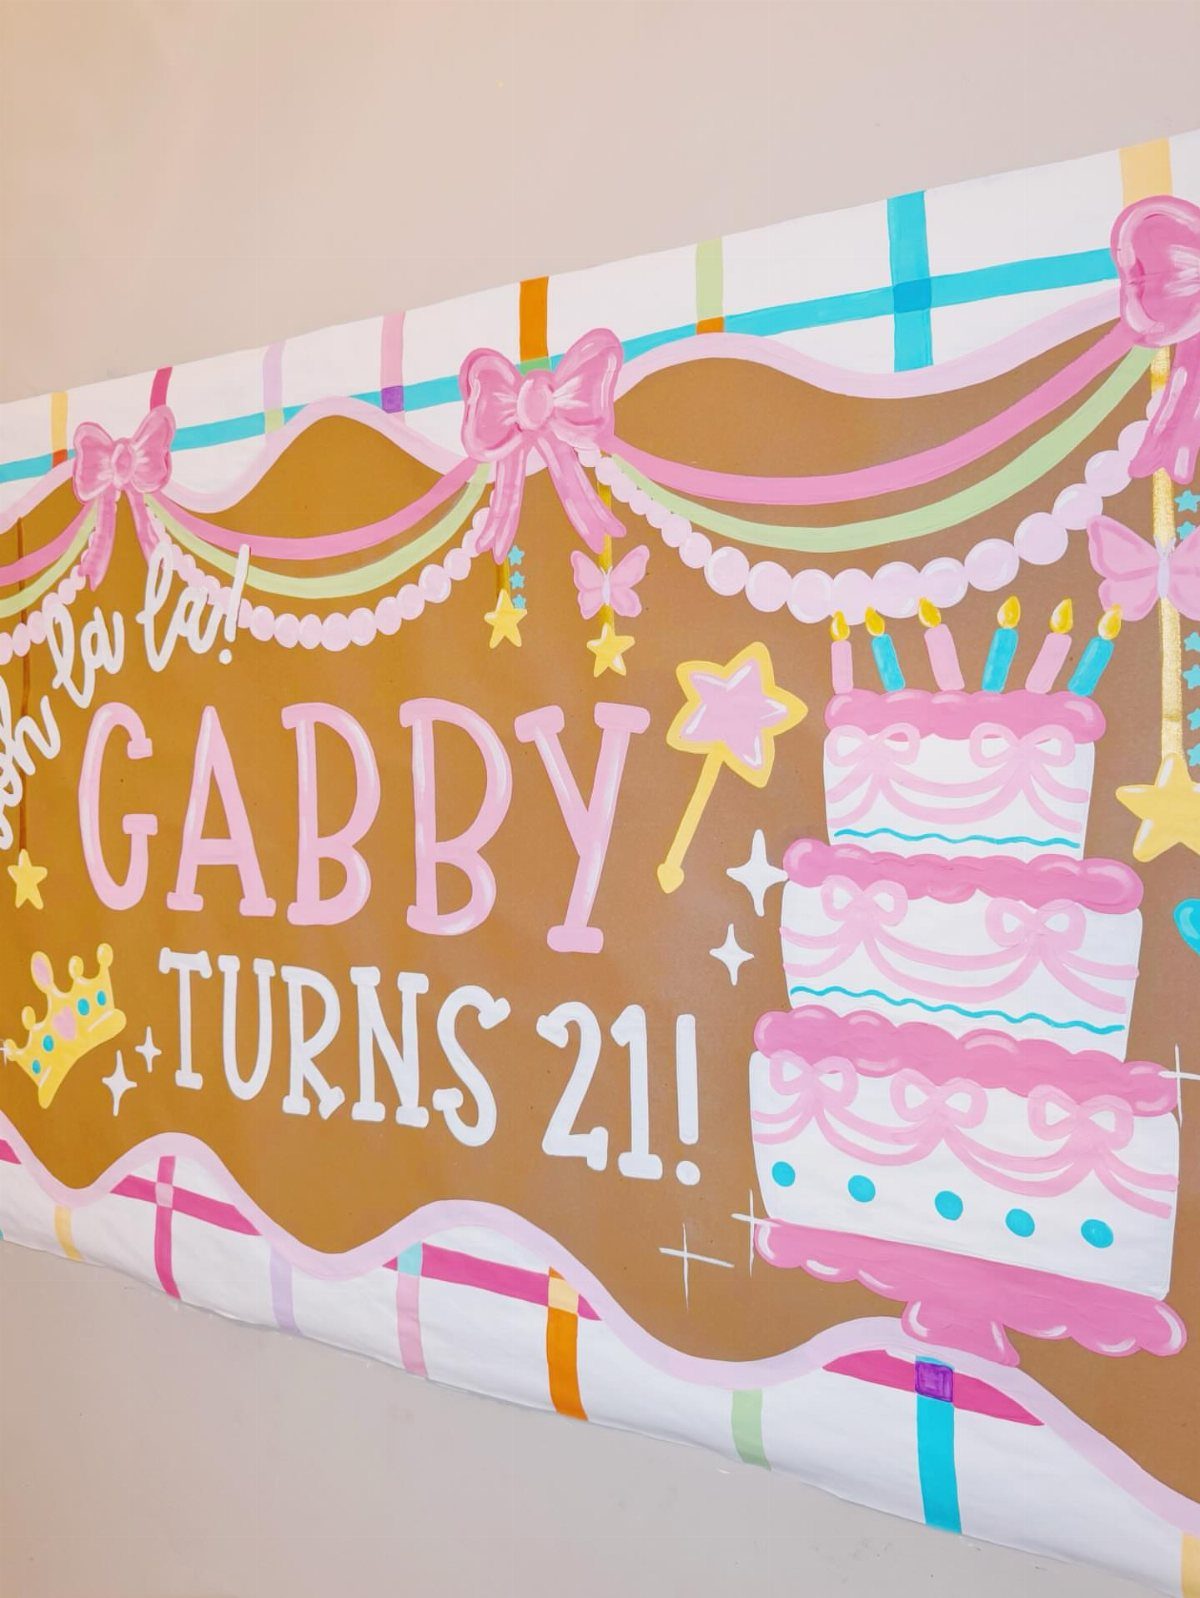
Pearls on a banner are easiest as a garland: paint a row of small white circles in a loose curve, then add a tiny highlight dot on each so they read as round.
Bows work the same way, two loops, a center knot and two tails, in pink against brown.
A plaid border is more work than stripes, so I would tape it and paint in layers, lightest color first.
8. Pastel Stripes and Pink Wavy Border
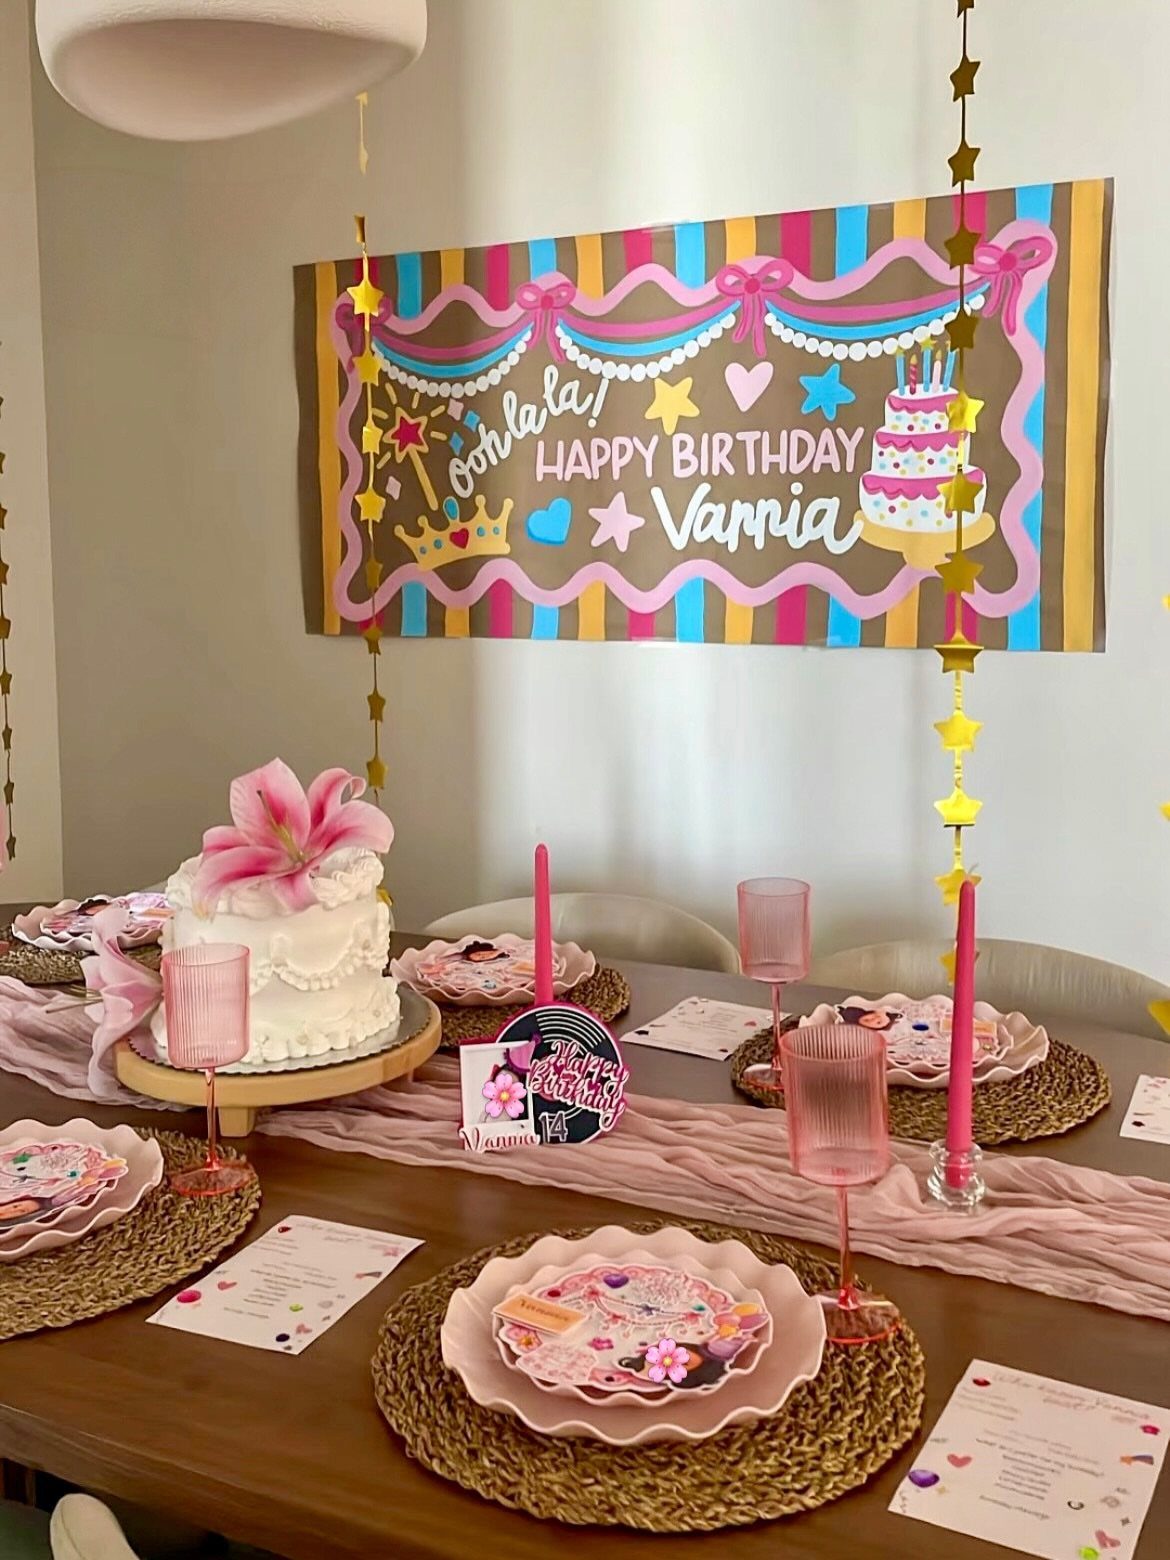
Soft pastels suit a banner that hangs over a dining table, where it should sit quietly behind the cake instead of competing with it.
Tape off the stripes, paint between the lines, and peel the tape once the paint is dry for crisp edges.
A wavy pink border is freehand, so keep the curves wide and let them wobble a little. Paint it after the lettering, and add a short French phrase like "Ooh la la!" above the greeting for a playful touch.
9. Floral Accents
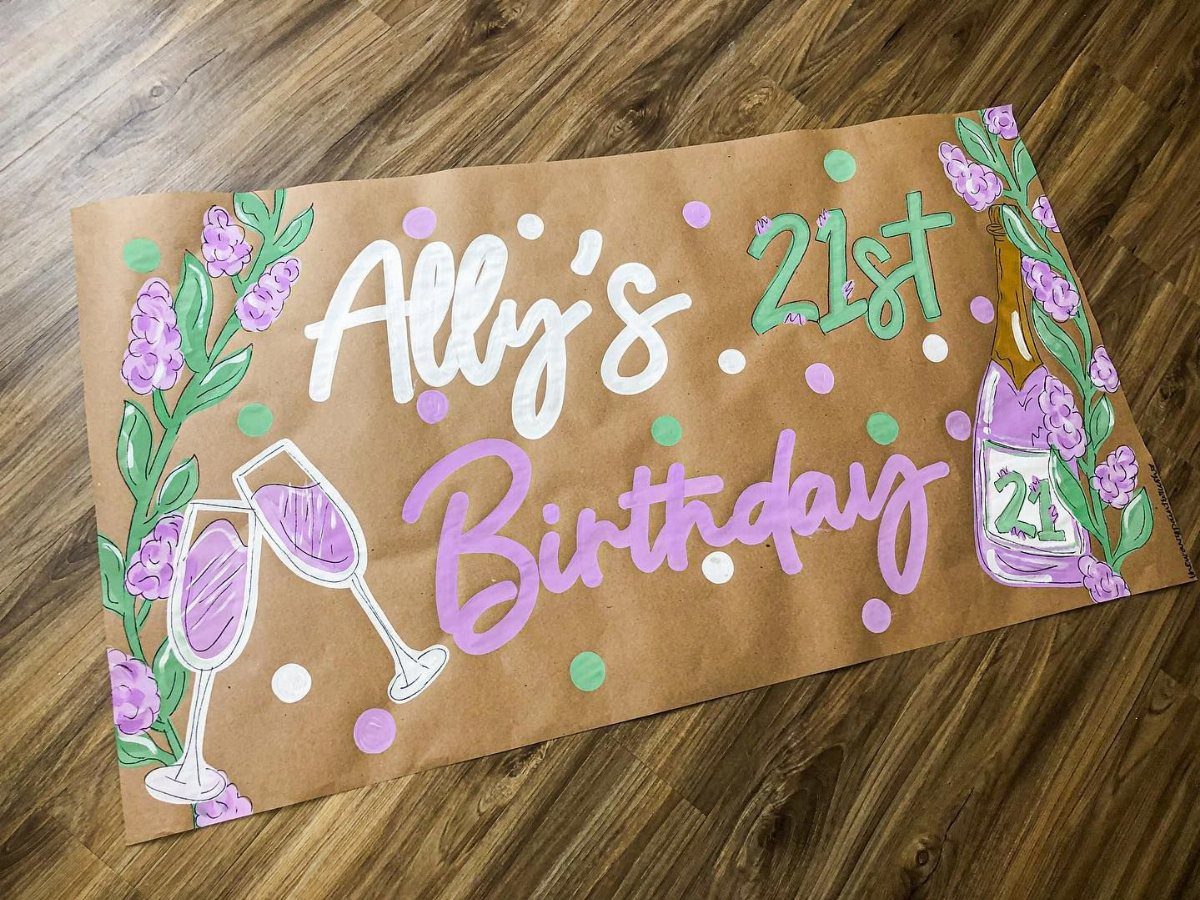
Purple flowers on brown paper look best when the petals are simple: rounded strokes around a center dot, with a few leaves in between. Vary the sizes so the cluster feels natural rather than stamped.
I would tuck the blooms around the champagne glasses and bottle instead of spreading them evenly, so the name and "21st" stay clear.
Write the lettering first, let it dry, then add the flowers. Paper this thin can curl when wet, so go easy on the water.
Materials Used
Brown craft paper is the base, and it works because it lets pink and white paint read as soft, solid colors. Buy a roll rather than sheets so the banner has no seams.
Acrylics cover best. White needs 2 coats on brown, so let the first dry fully before the second.
Rhinestones and glitter are the finishing layer. Use craft glue for the stones and add them after the paint has dried, or they will slide.
Glitter is easiest to control when you dab glue only where you want it and tap off the extra over a tray.
Personalization Options
Start with 3 choices: the wording, the colors and the event theme. Settle all three before you open any paint, because the lettering is the hardest part to change.
One banner pairs purple and gold with white polka dots, script lettering and hand-drawn champagne bottles hung with tiny jewels.
Another uses kraft paper as the base, adds blue-outlined letters and yellow beer steins filled with white foam, then scatters blue and white confetti across the surface, and the palettes stay tight enough that both read clearly.
If you want a head start, a digital banner template can be printed and traced. You still choose the name and colors, and tracing keeps the letter shapes even.
Size Variations
A banner about 3 feet tall and 4–8 feet long is the size range to plan around. Pick the length by the wall or table it will hang over.
Measure that space first, then cut the paper a little under the full width so it does not touch the corners. The shorter end suits a small table, and the longer end suits a wall with room to spare.
Paint a tall banner taped flat to a wall, and step back every few letters to check the spacing. Roll it loosely, never fold it, when you carry it to the party.